Today I will show you how to install owncloud on centOS 7 via SSH CLI. And get your own cloud storage without any extra cost. I am using a VPS in this guide with 512MB RAM and 100GB space. At the end of this guide, I should have roughly 98GB of cloud storage. Owncloud requires MySQL sever, apache server and PHP 5.5 installed on your server, because owncloud is a web application working on SQL and PHP 5.5. In this tutorial we are going to install Apache as our web server, mariadb as our SQL server and Apache as web-server.
Owncloud is an open-source cloud file storage solution that is available for almost any Operating System you can think of. There are also dedicated owncloud clients available for iPhone, Android and Windows phone market. So you can also access your owncloud storage from your mobile devices.
Things required to install owncloud.
- A system running centOS 7. I am using a VPS.
- Basic knowledge of SSH commands.
- 30 minutes of your time.
- How To Install VestaCP on CentOS 6.5 VPS
- How to Install Zpanel on CentOS 6.x and Ubuntu
- How to Install VNC server on Ubuntu
- Benifitial uses of VPS, Buying guide.
Install owncloud in centOS 7
- Login to your VPS as root using SSH client. I am using putty for windows but you can also use terminal if you are mac user.
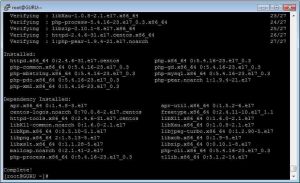
- Install php5.5, Apache, mysql server and other extensions required for owncloud. Owncloud requires LAMP stack to be installed to work.
yum update

yum install httpd php php-mysql php-dom php-mbstring php-gd php-pdo php-json php-xml php-zip php-gd curl php-curl php-mcrypt php-pear maridb mariadb-server -y
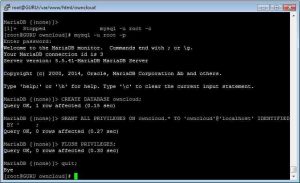
- Start mysql server by following command:
systemctl start mariadb - Make your SQL server secure by running following command:
mysql_secure_installation - You will be prompted to enter your mysql password, just set a secure and hard-to-guess password and disable anonymous access to mysql server.
- Download latest version of owncloud using wget command. I am using owncloud 8.0.4 which is latest at this time.
wget https://download.owncloud.org/community/owncloud-8.0.4.zip - Extract the downloaded archive using this command.
yum install -y zip unzip

unzip owncloud-8.0.4.zip - Now move owncloud directory to apache folder using the command given below.
mv owncloud /var/www/html/owncloud - Set the owner of data/ apps/ and config folders to apache. Just copy and paste all command one by one.
chown -R apache:apache /var/www/html/owncloud - After that you have to make a new SQL database and grant full access to a user.
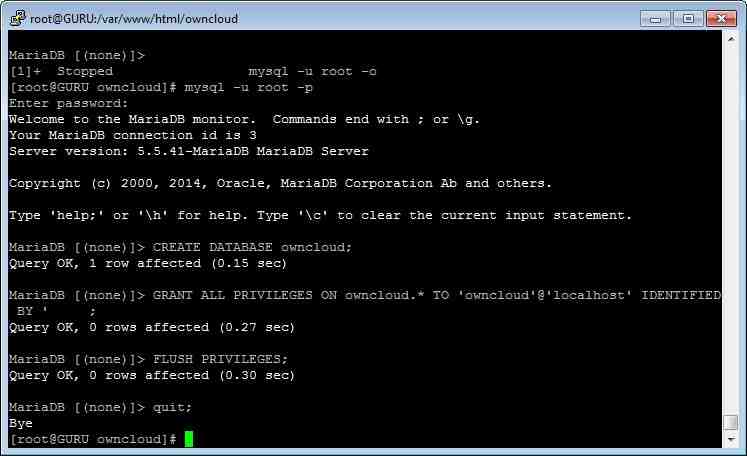
mysql -uroot -p
Enter your mysql password that you set in earlier steps
CREATE DATABASE owncloud;

GRANT ALL PRIVILEGES ON owncloud.* TO 'owncloud'@'localhost' IDENTIFIED BY 'PASSWORD_HERE';

FLUSH PRIVILEGES;

quit;
- Start the apache server and access you owncloud via http://ip-address/owncloud
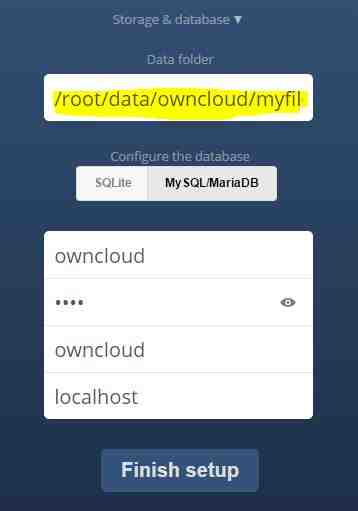
systemctl start httpd - Now you have to make sure that your owncloud files are not directly accessible to public. I highly recommend you to set you data directory somewhere else in the server, because you don’t want unauthorized access to you Owncloud files.
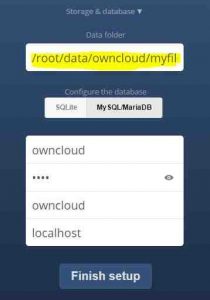
- In your web browser, you have to create admin account first. Also enter the database details you choose in step 10.
- Now you should be able to access owncloud from your computer and mobile as well.
If you liked it, then share with others and help us spread the word. Join the discussion below if you have any suggestion or problem during the process.

